Sunday 9 February 2014
The YouTube BRIT Awards 2014!
Hello everyone.
We are really looking forward to the awards next week. There will be prizes and food!
The videos can be found at,
Please use the form below to vote on your
favourite videos please. Only vote once, watch all the video before you vote
and fill in your names correctly please.
More will be added as they finished.
If you have a BRIT Year 10 Theatre page
please post this email content on to it.
Friday 7 February 2014
YouTube BRIT Awards.
Hello everyone.
Please visit the YouTube BRIT Award Channel to see everyone's videos.
They are listed upon favourites.
http://www.youtube.com/channel/UCauRVwZDSEVQ-7iYPdFwOzQ
Please make sure your own videos are listed as public!
Mr R.
Please visit the YouTube BRIT Award Channel to see everyone's videos.
They are listed upon favourites.
http://www.youtube.com/channel/UCauRVwZDSEVQ-7iYPdFwOzQ
Please make sure your own videos are listed as public!
Mr R.
Awards Presenter Notes
You need a fun opening.
Late-night hosts have often opened with a monologue. That's fine, as long as it's really funny, but otherwise, take a cue from Jimmy Fallon when he hosted the Emmys a few years ago: big silly musical number with lots of self-deprecating jokes.
Step No. 3: Amp up the musicSeriously Sparkles, where did you get the soundtrack for your event? Your retired, polka-loving neighbor’s garage sale? I don’t care how old your audience is, no one really likes the music you have been piping in. Go current, go eclectic and go mainstream. You only need three elements for music at an awards event – Walk In, Dinner and Winner Walk Away — so make it count. The genre could be house, country or rock music, just make it interesting and worthy of a winner. You do not want the ambiance in the room to smack of singles night at the old folks home, even if your event is at the old folks home. Use drum rolls. Dress fancy. Funny running Joke that goes through the whole event. Cue cards.
what do you call a psychic midget who has escaped from prison?
A SMALL MEDIUM AT LARGE!
What happened when the butcher backed into his meat grinder?
HE GOT A LITTLE BEHIND IN HIS WORK
Popcorn Letter Edit 1
Dear Sue,
Hello, my name is Chloe and I’m in year 10 Theatre Strand and I was just wondering for Thursday if we could use the popcorn machine for YouTube BRIT Awards 2014 in are Theatre lesson. We would properly need about 2 bags of popcorn and we will be providing the popcorn so you won’t lose out on money. Furthermore, if you need to ask any questions you can speak to my teacher Mr Rennsion or me. We would properly need to use the popcorn machine early Friday morning and we won’t get in your way while you’re working and we won’t take long at all. Let me know if we can use the popcorn/ cant.
Thank you,
Yours faithfully,
Chloe Harris
Festival Notes
Everyone in at 8.30.
Festival Selection.
Edgar, Danny,
design nominee and winner cards.
Best film + voting sheet.
Best edited
Special effects
Best documentary
Best content
Presenters and
researching presenting
Sam and Eleanor.
Chloe
Popcorn, emailing
Sue.
Awards description
Gold envelopes,
Red carpet, Dan?
Swag clothing.
Fifi, Olivia,
Lauren, Prize winner
Trophies
Youtube BRIT 2014
Allocated seat and
tables.
Camera crew.
Tobi.
Advertising awards
movie trailer.
Courtney
Friday 24 January 2014
Lesson 3
Lesson 3
YouTube
has a browser-based
video editor. The
tool, which requires no additional software, or browser plug-ins (besides
Adobe's Flash), lets users make minor edits to videos you've uploaded, as well
as stitch several clips together into one.
1.
Upload

First
things first, you need to upload your videos. You can't actually do this
through the editor--they need to be on YouTube before you even begin. If you're
new here, that involves hitting the large "upload" link on the top of
the YouTube home page, then following the directions.
2.
Arrange
To get to
YouTube's editor visit the direct YouTube.com/editor link.
Once
here, you'll see a listing of your videos in chronological order.
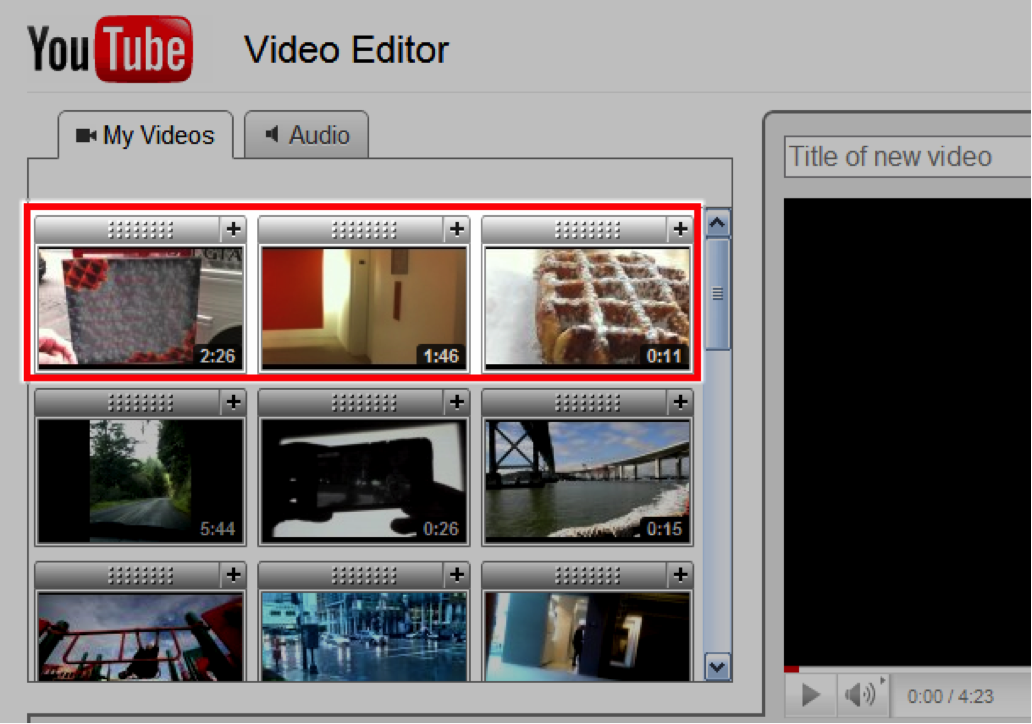
To add
videos to your time line just drag them from your video list. To add different
parts of the same clip, you can just drag the clip into the time line twice.
To add
clips to your video you can drag them from the "my videos" section,
down to the time line, or you can hit the plus icon that's in each clip's top
right hand corner. In case you're not sure what a clip contains, you can mouse
over it and hit the play icon to watch the whole thing without leaving the
page.
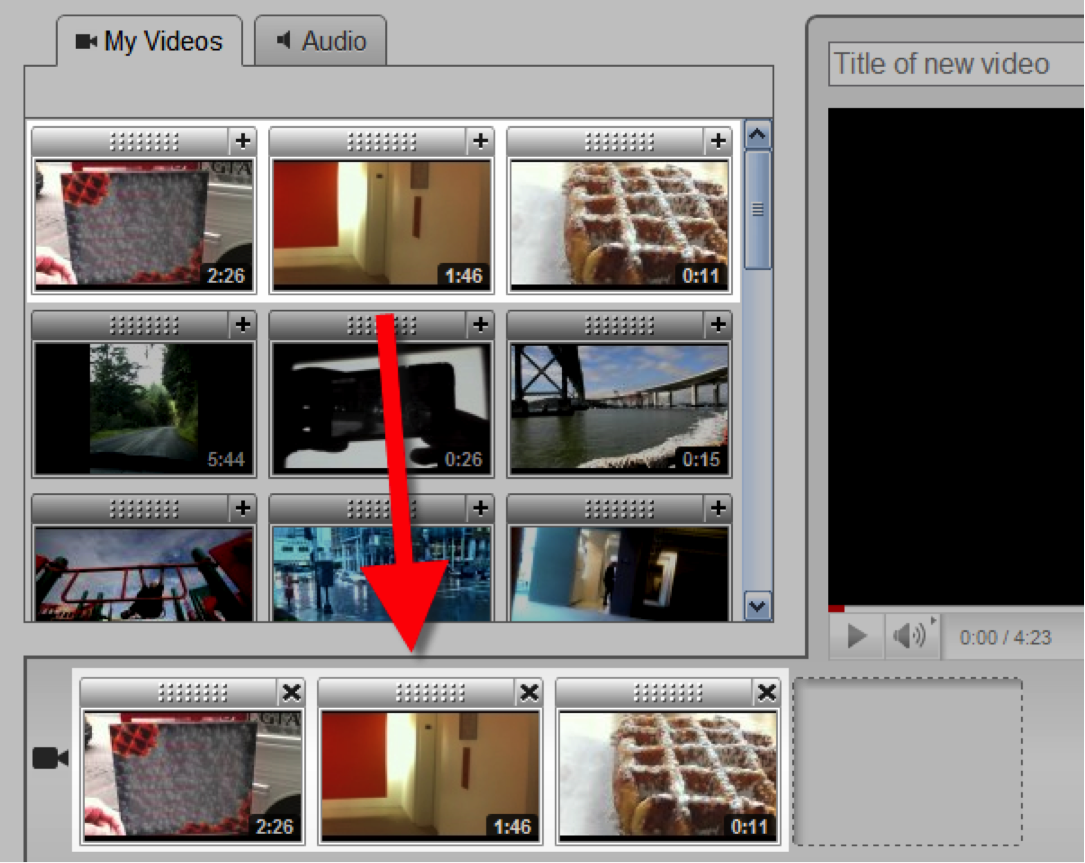
To add
clips, just select them in the source list and drag them down into the time
line. You can also hit the little plus icon in the top right corner.
3.
Cut
At this
point, if you don't need to make any edits to your videos, you can just give
your work a title and hit the publish button. But that's no fun, is it? To make
use of the editor's power you need to make some cuts.
YouTube's
editor lets you trim a video, but not split it, so if you want to cut a single
clip into two or more parts you need to drag more copies of that video down
into the time line.
Tip
One very important thing to note right up front is that you
can have only seven clips in your time line; this means cutting up something
longer into several smaller clips will take up more of that work space. It's
definitely something to think about when you're capturing video and know that
you're going to use this editor.
Once
you've added clips to your time line, you want to hit the scissors icon that
appears when you mouse over the time line. This pulls up the edit dialog, where
you can pick the in and out points of the clip. From there, you just need to
drag the start and end markers to contain the segment of the clip you want to
use.

To start
the edit process, just hover over a clip that's in your time line and click on
the blue scissors link.
To view
the edit you're in the progress of making, you can just press the play button
and it will start wherever you set your in point. Work the start and end points
into the spots where you want them, then hit save to finish the edit for that
particular clip.
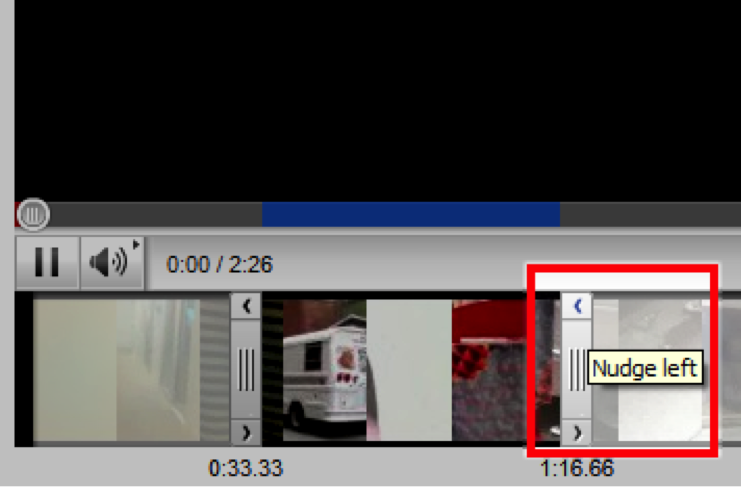
Nudging a
clip can be accomplished by clicking the little left and right arrows that can
be found on the video trimmers. Each of these adjusts the playtime by 1/15th of
a second.
Tip: If you want a finer level of control,
you can hit the little left and right arrows that are on the top and bottom of
the in/out points. These "nudges," as YouTube calls them, go forward
or backward by 1/15th of a second, which can help give you a more exact stop or
end point than you'd get with your mouse.
4.
Audio (optional)
While you
can't adjust the volume level, or add an audio track of your own, you can
use YouTube's AudioSwap feature to add music to your creation.
Tip
It's worth noting that just like using AudioSwap on a standard YouTube video,
using it in YouTube's editor completely removes any audio that was already in
your video. You can add only one audio track to your work, so you have to
choose wisely.
5.
Publish
When
you're done, just give your work a title and hit the publish button. This takes
you to the same screen you'd see if you went into the "edit video"
dialog.
Tip
You can delete the original video clips you used, and your new creation will continue to exist once published.
You can delete the original video clips you used, and your new creation will continue to exist once published.
Thursday 16 January 2014

Camera Angles and Shots
Watch this video the learn the 17 most popular
camera angles and shots used in movies!
Lesson 2
Activity 1
You should create a Story Board,which helps you map out precisely what viewers
will see and hear in each scene.
E.g.

Download it here...
Download it here...
You can do more than 5 shots!
Activity 2
Activity 2
Create
storyboards that outline how each scene will be filmed, including such details
as camera angles, the length of each shot and directions for the actors. Once
you have completed your storyboard charts, you have the week to
film and upload their footage onto the YouTube editor ready for next lesson.
Subscribe to:
Posts (Atom)